Showing posts with label KaiserCraft. Show all posts

Tuesday, April 3, 2012

Kaisercraft Tuesday Tip: Dimensional Hearts

Here to post a Kaisercraft Tuesday Tip one week late...

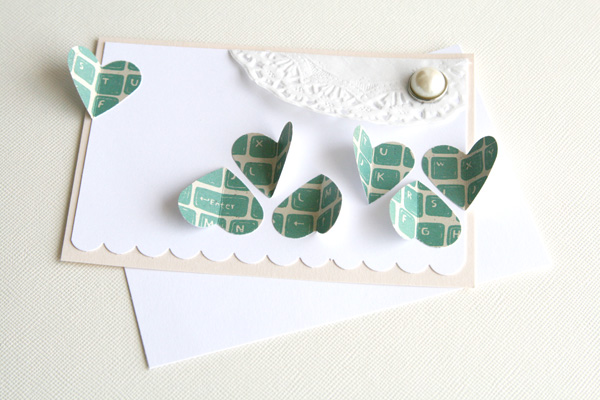
As you have likely seen in many of my projects, I love using hearts in different ways to create dimension and patterns. Today, I’m going to show how you can simply use pattern paper and hearts folded in half to create a simple and sweet turning note card.

Materials Used: Kaisercraft Technologic Paper Pad, Kaisercraft Pearl Brad, Martha Stewart Heart punch, Stampin' Up Scallop Edge punch, doily

Step 1: Punch hearts right-side-up and upside-down.


Step 2: Fold hearts in half and paste one side of the base down. Alternate to create a pattern or do it randomly to create random dimension.


It's so simple! The best part about this card is that you get dimension but it folds up and mails relatively flat. You can also make this a card instead of a turning note card by leaving the pearl brad out.

Thanks for stopping by!
- KRAFTY pearl

Thursday, March 15, 2012

Tea Time, Tea Notes

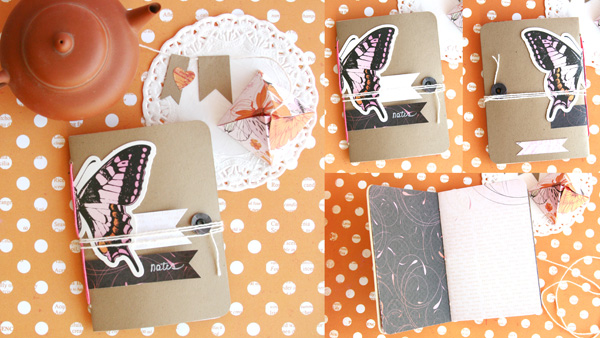
Tea is one of my favorite drinks and if I were to ever throw a tea party, I'd use the lovely Kaisercraft Tigerlilly collection.


Materials Used: Kaisercraft Tigerlilly Blossom Double-Sided 12"X12" Paper, Blush Double-Sided 12"X12" Paper, Pomegranate Double-Sided 12"X12" Paper, Flamingo Double-Sided 12"X12" Paper, Collectables Die-Cuts; Other: embroidery floss, twine, eyelet

Inspired by the lovely floral patterns, I created a notebook to take notes on different tea leaves and brews. To make the perfect tea party set-up, I also created pyramid tea wrappers as favors to collect tea leaves for enjoying after the party!

Hope you like what you see and make sure you stop by the Kaisercraft blog for more inspiration!

Thanks for stopping by!
- KRAFTY pearl

Monday, March 12, 2012

Three of a Kind

One of my favorite photography techniques for creating a symmetrical and cohesive scrapbook layout is to use three photos with similar shapes.


Materials Used:
Kaisercraft Tigerlilly Blush Double-sided 12"x12" Paper, Flamingo Double-sided 12"x12" Paper, Collectables Die-Cuts, Chipboard Alpha 1; Other: Classic Heart Spellbinders Nestabilities Dies, Janome Sew Mini Sewing Machine

My fiance and I took photos of each other in front of a lancet doorway. I then snapped another photo of the green rolling hills of Napa framed by another lancet window. Put them side by side and I have myself an interesting layout using very simple design principals - symmetry and repetition!

Highlight the colors from the photos with beautiful bright pinks and oranges from the Kaisercraft's Tigerlilly collection, sprinkle some hearts, and I have a simply fun layout. If you love strong contrasting colors in classic prints, you'll love the Tigerlilly collection and it's especially perfect for the spring and summer months.

Hope you like this technique and don't forget to visit the Kaisercraft blog for more inspiration!

Thanks for stopping by!
- KRAFTY pearl
Monday, March 5, 2012

Dream on...

Happy Monday! I'm here to share an abstract card today. I haven't used my pretty Copics in some time now, so it was a lot of fun drawing with them.


Materials Used: Kaisercraft Tiny Woods Sycamore (front & back); Other: Copics

I was inspired by the Kaisercraft Tiny Woods Sycamore pattern paper. It looked like waves or hills weaved into a pattern, but I focused on its shape and how if taken a part, it could very well look like a mermaid's tail. To give the illusion of a full mermaid's tail, I drew hearts in the shape and shading of scales. But are they hearts or are they scales? I decided to get a little artsy and try a little impressionism in the card. One of my favorite techniques with pattern papers is deconstructing the pattern and shape it into something else. Give it a try!

Hope you like what you see here and don't forget to visit the Kaisercraft blog for more inspiration!

Thanks for stopping by!
- KRAFTY pearl

Wednesday, February 29, 2012

Blessing...

Happy leap year day! On this special day that only happens once every four years, I thought I'd share a layout about one of the blessings in my life... Kryssi.


Materials Used: Kaisercraft These Days Ancestry, Generation, Collectables Die-Cuts, Mini Alphabets

This photo was taken at Kryssi's wedding many many many years ago. Fast forward practically a decade later, our friendship has become so much more. She is a blessing and I'm so grateful to have her in my life. I created a pocket behind the matted photo where I tucked in some sappy journaling on a Collectables Die-Cut label. The Kaisercraft "These Days" collection is perfect to complement wedding photos new and old!

Thanks for stopping by!
- KRAFTY pearl

Monday, February 27, 2012

Sweet Treats For My Sweetheart

Back with another project great for any day of the year!


Materials Used: Kaisercraft These Days Ancestry, Family, Collectables Die-Cuts; Other: Whisker Graphics twine, Uchida Scallop Oval Craft Punch

Chocolates as a gift is even sweeter when it comes in handmade packaging. I created a pull out drawer box using the beautiful and romantic papers from the "These Days" collection by Kaisercraft. The red/pink polka dot design of "Family" is gorgeous and is perfect for sweet love-themed projects. I simply dressed up the box in a bit of twine and embellished with a label from the "These Days" Collectables, and other punched shapes.

Don't forget to check out the Kaisercraft blog for more inspiration!

Thanks for stopping by!
- KRAFTY pearl

Monday, February 20, 2012

Everyday Should Be Valentine's Day

That's a motto of mine. I think it's great that we have a special day to celebrate love, but I think everyday should be Valentine's Day. With that in mind, here's another project that can be made for any occasion!


Materials Used: Kaisercraft Tiny Woods Cypress, Pine, Pearl brads; Other: Whisker Graphics twine, Uchida Scallop Oval Craft Punch, doily, candle, matches, tin box

I decided to make something different from the usual. Inspired by mini survival kits in a box, I decided to create a date night theme, a candle light dinner in a box! To create the matchbook, I took apart a match book and recreated the cover using "Pine". I used a pearl brad to hold the matchbook cover and matches together. A simple and cute gift to give to your date any day of the year!

Thanks for stopping by!
- KRAFTY pearl

Tuesday, February 14, 2012

Happy Valentine's Day!

Happy Valentine's Day, ya'll! And if you happen to be making a last minute Valentine, here's a quick and simple card.


Materials Used: Kaisercraft Hummingbird Paper Pad, Foam Tape; Other: Martha Stewart heart punch

I love the designs from the papers in the Kaisercraft Hummingbird paper pad. Each one can be simply added to a card to have a huge impact. I created a very simple yet elegant card using the design of two facing birds. I layered on a piece of cardstock with a punched heart window. I used foam tape to to create depth in the window.

I wish you love!

Thanks for stopping by!
- KRAFTY pearl

Thursday, February 9, 2012

It's Been a While, Hawaii!

I can't help but think about vacations and tropical places in this heart of winter! And so I think of Hawaii!


Materials Used: Hummingbird Paper Pad, Paper (Nectar, Flight, and Feather), Collectables Die-Cuts, Merry Medley Verse Paper, Miss Nelly Her Style Paper, Chipboard Alpha 1 and 2, Grass Green Paint, Tiny Alphas; Other: Round punch

The Kaisercraft Hummingbird collection is perfectly coordinated and wonderful for making a tropical vacation album. I even pulled up some older Kaisercraft collections such as the Merry Medley and Miss Nelly which combines so well for a thick mini scrapbook album. The Hummingbird Collectable Die-Cuts are also perfect for easy and effect embellishment for a cohesive album. If you have a stack of photos from your last tropical vacation still waiting to be scrapbooked, this collection is a perfect match!

Thanks for stopping by!
- KRAFTY pearl

Monday, February 6, 2012

Home Is Where the Heart Is

Hope you had a great weekend! Today, I'm sharing a special little mini album. I love my apartment and all the bright colors in it. There isn't a single detail I didn't design myself. I documented my labor of love in this mini album:


Materials Used: Kaisercraft Lil Primrose Proper, Collectables Die-Cuts, Paper Pad, Tiny Alphas

This is my first own home, a cozy apartment with many bright contrasting and welcoming colors. The Kaisercraft Lil Primrose collection had just the perfect touch and colors to complement the photos. The best part of the mini is how easy it is to make.

To create your own house shaped mini album, cut a 2 inch by 12 inch strip of cardstock. Score at every 2 inch mark, and fold in a zig zag manner. To create the door, cut a small piece of pattern paper and fold in half, adhere to the front of the house, and finally add a pearl to create the doorknob. Add photos and embellishments to finish the mini.

Thanks for stopping by!
- KRAFTY pearl

Saturday, February 4, 2012

A Kaisercraft Saturday Sketch Challenge!

Woohoo! It's Saturday! And it's time for another Kaisercraft Saturday Sketch challenge. Here's my take on the sketch:


Materials Used: Kaisercraft These Days Collectables and Collection
Other: Sewing machine, tissue paper

Kaisercraft's These Days collection is so beautiful, soft, and romantic. I especially love how versatile the These Days Collectables die-cuts are and they're perfect to use in this sketch challenge. I created a layout about why I love Etsy and used collateral I've collected from their fairs and combined them with die-cuts and tissue paper hearts to re-create a layout based on the sketch. I really enjoy working with sketches because I love a good challenge. This one was definitely challenging because the sketch calls for a lot of embellishments. Given that my style is a little more minimalistic, I dialed down the embellishments to still match the sketch but stay true to my design style. I hope you'll enjoy playing with this sketch too regardless of your design style! Visit the Kaisercraft blog to play along.

The layout is based on this Kaisercraft Saturday Sketch Challenge sketch:


Thanks for stopping by!
- KRAFTY pearl

Saturday, January 7, 2012

Make Your Own Photobooth & Props

Happy weekend! Photobooth-style photos, mustache props, and bow-tie props are all the rage these days. But you don't need to go to a photobooth to get that style. Today I'll be sharing two tips in one! And I bet you will have so much fun giving this a try this weekend!


Materials Used: Kaisercraft On The Move Cylinders; Other: skewers, glue dots

Make Your Own Mustache & Bow-tie Props

You'll need:
  • colorful pattern paper
  • skewers
  • glue dots
  • scoring tool
  • a good doodling hand
  • pencil + eraser

How-to:
  1. Score and fold your pattern paper in half
  2. Following a similar doodling pattern as the above, use a pencil to draw the shapes right next to the fold
  3. Cut the shapes and unfold the paper to get a perfectly symmetrical mustache or bow-tie
  4. Stick to skewers with glue dots
Make Your Own Photobooth

You'll need:
  • camera with timer + flash + tripod
  • a clean background
  • don't forget your props!
  • photo/image editing software
How-to:
  1. Set up your camera, timer, flash, and tripod to face about 4 feet away from your blank wall
  2. Click your timer and any continuous snap features you may have
  3. Stand in front of your blank wall and let the camera snap you in funny poses
  4. Once you have your photos, just create a stacked strip of images using any editing software
Now go on, have fun and be silly!

I have also been playing around a lot with Incredibooth for the iPhone which creates photobooth style pictures for you automatically! (Thanks, Wynne!)

Speaking of which, let me share my fave iPhone photo apps:
  • Hipstamatic - (app here, more details here)
  • Incredibooth - (app here, more details here)
  • Instagram - (app here, more details here)
Hope you enjoyed this tutorial and playing with some of the above apps!

Thanks for stopping by!
- KRAFTY pearl

Wednesday, January 4, 2012

Getting Organized: Tape Holder Shelf

It's January, so it's time to get organized! I've accumulated a small collection of tape and I've been looking for a flexible system to store them. Here's what I made:


Materials Used: Kaisercraft Sweet Nothings You & Me, Acrylic Paint in Gold, Mini Drawers; Other: Mod Podge

I love Kaisercraft's mini drawers because it's up to you with how you want to use it. Perhaps you have need for all the small compartments to hold beads or small findings. For me, the foundation shelf for the mini drawers was perfect to store all of my tapes. I love how it can stand horizontally like a bin or vertically like a shelf.

And it was so easy to make! I first painted the entire piece with gold acrylic paint. I then carefully adhered all of the paper to the shelf using Mod Podge. I then clipped a medium sized binder clip to hold my mini scissors which are perfect to snip tape. So simple and easy!

Thanks for stopping by!
- KRAFTY pearl

Tuesday, November 22, 2011

Thankful for Being "Best Dressed"...

Well, not really for being "best dressed" but rather, I'm thankful for my parents! I was going through a ton of old photos last month and I came across these showing some of the items my mom had sewn and knitted for me when I was a kid. Of course, the vintage feel of the lovely Kaisercraft Madam Boutique collection was perfect for these old school photos.

pearllui-kaisercraft-madame-layout-bestdressed-600

Materials Used: Kaisercraft Madam Boutique Blouse pattern paper, Madam Boutique Collectables, Alphas 12 x 12 Sticker Sheet, crochet doily; Other: Janome Sew Mini Sewing Machine, satin ribbon, white pen

I'm so glad my dad took these photos, because this gives me a glimpse into their lives before I could remember. So as you celebrate Thanksgiving this week, don't forget to have your camera with you to capture all your merry moments, and most importantly, live in those moments and be present! If I don't get to come back on the blog before Thanksgiving Day, have a very happy turkey day!

Thanks for stopping by!
- KRAFTY pearl

Thursday, November 17, 2011

Thankful for the City Sky

Often times we forget to just stop and "smell the roses." Or in my case, stop to soak in the beautiful city sky at sunset. With this gorgeous view, who needs the white picket fence! I am thankful for moments like this...

pearllui-kaisercraft-merrymedley-layout-citysky-600

Materials Used: Kaisercraft Merry Medley Harmony and Melody pattern paper, Timeless Black & White paper pad, Cock-a-doodle-doo! Farm 12x12 sticker sheet, Alphas 12x12 sticker sheet; Other: Corner punch, BIC Mark-It markers, Janome Sew Mini Sewing Machine

The Kaisercraft Merry Medley collection has an abundance of possibilities for all year round because of its fun and season-less designs. It has great colors for Christmas, but it also has great subtle and neutral colors as I used here in my layout. One of my favorite parts of the layout is where I mimicked the picture's city skyline by cutting out skylines using three different pattern papers.

Hope you like what you see and be sure to check out the Kaisercraft blog for more inspiration!

Thanks for stopping by!
- KRAFTY pearl

Wednesday, November 16, 2011

Thankful for My Fave Munchkins

I can't believe it's mid-November already! I thought it'd be fun if I started a "thankful" series for the remainder of the month. I'm still super happy and thankful to have made the Hambly team! But today, I'm hear to share some layouts I made with this month's new Kaisercraft releases.

I'm thankful to be a proud godmom to these super sweet and yummy little munchkins. They always manage to make me smile, and how can I not? Just look at these cuties!


Materials Used: Kaisercraft Cock-a-doodle-doo! Meow! and Woof! pattern papers, Neigh! 12 x 12 gloss specialty, foam tape; Other: Janome Sew Mini Sewing Machine

The Kaisercraft Cock-a-doodle-doo! collection is perfect for fun layouts of farms, parks, gardens, etc. But here I used the fun papers to create a layout about my lovely godchildren. I cut strips of paper and banner and adhered them to the layout using a messy double zig zag stitch around the page. I also cut animal shapes from the Neigh! pattern paper. So simple and fun!

Don't forget to check out the Kaisercraft blog for more inspiration!

Thanks for stopping by!
- KRAFTY pearl

Monday, October 31, 2011

Have a Spook-tacular Halloween!

Happy Halloween, everyone! Here to share a classic technique, perfect for today.

One of my favorite ways to decorate for Halloween is to cluster candles to set that spooky mood. The best part is that you get to make any design you want on the candles.

You'll need:
  • ivory or white candles
  • ivory or white tissue paper
  • wax paper
  • stamps and ink
  • heat gun
  • gloves to protect from heat/hot wax
  • scrap paper or craft mat
Make your own designs on candles with these easy steps!
  1. Stamp image onto tissue paper like so:

  2. Layer on stamped tissue paper over candle
  3. Layer wax paper over the tissue paper sandwiching the tissue paper between the candle and wax paper
  4. Slowly heat the wax paper over the stamped image with a heat gun
  5. Lastly, peel the wax paper off and the stamped tissue paper will magically be melted onto the candle
Tip 1: Be careful to keep the tip of the heat gun a safe distance so you don't burn the wax

Tip 2: If you're sensitive to heat, put on protective gloves to keep the heat or hot wax from dripping on your fingers as you handle the candles

Tip 3: Make sure you protect your work surface with either scrap paper or a craft mat to collect any wax drips

Materials: Kaisercraft 13th Hour Clear Stamp; Other: candles, tissue paper, wax paper, Memento ink in Tuxedo Black, heat gun


This really is a simple and classic way to dress up candles for a spooky Halloween look, so it's not too late to give it a try!

Thanks for stopping by!
- KRAFTY pearl

Friday, October 28, 2011

Trick-or-Treat!

Happy Friday! With the Halloween weekend beginning tomorrow, do you have all of your decorations ready?

pearllui-kaisercraft-13thhour-btp-candycorn-600

If you have and want to make some more decorations or if you haven't at all and just want a quick candy tray or centerpiece, you can make this too!

There's something super fun and spooky about the black and white patterns from the Kaisercraft 13th Hour collection. I decided to add bright orange and yellow candy corn to contrast with the black and white. I colored skewers in black, hot-glued them to the nest, tied twine around the skewers several times, hung die-cuts from the back of the paper pad to the twine with clothespins, further embellished with printed chipboard crows and dominoes, and added candy corn - so simple!

Materials Used: Kaisercraft 13th Hour Paper Pad, Printed Chipboards; Other: Whisker Graphics twine, skewers, nest, mini clothespins

Thanks for stopping by!
- KRAFTY pearl

Wednesday, October 26, 2011

Have You Found Your Costume Yet?

Halloween is just a few days away, have you found your costume yet? I reflected on the group costumes my friends and I have worn in the last few years and decided to make a layout from them.

pearllui-kaisercraft-13thhour-layout-halloween-600

The Kaisercraft 13th Hour collection is perfect for Halloween photos. One of my favorite patterns is the Midnight pattern paper. I particularly love the dimension in the design, weaved between the branches are purple and orange patterns. Since the paper is so awesome as is, I wanted to keep the layout simple but echo the dimension. I drew a moon eclipse, cut it using a craft knife, then slipped a printed acetate sheet beneath it to create some more dimension, and lastly added the title "Halloween", created from the Slice machine. I then clustered the photos in a 2x2 grid using various matting techniques.

Materials Used: Kaisercraft 13th Hour Midnight, Evening (front and back), Clocks Acetate, Rhinestones; Other: Fiskars Craft Knife; Making Memories Slice

Visit the Kaisercraft blog for more Halloween inspiration!

Thanks for stopping by!
- KRAFTY pearl

Monday, October 24, 2011

Halloween is Near!

Hope you had a great weekend! Sharing a fun and simple set of cards to get you in the kitschy Halloween mood.

pearllui-kaisercraft-13thhour-card-vampireowl-600

So I thought, wouldn't it be cool to make mini cards using the Kaisercraft's 13th Hour collection? I came up with this when I started drawing out different things that represent Halloween/October to me. Vampires and owls immediately came to mind and with the similar widow's peak shapes they have, I decided to create a pair of these cards playing on their similar shapes. I used a heart punch to create the widow's peaks, and the wings.

Materials Used: Kasiercraft 13th Hour Evening (front and back), Journaling Tags, Pearls; Other: Sizzix Big Shot machine, Nestabilities die, EK Success heart punch

Hope you like what you see here and don't forget to visit the Kaisercraft blog for more inspiration!

Thanks for stopping by!
- KRAFTY pearl